Students/Parents » Innovation

Innovation

Google CS First


Welcome to the Google CS First Station!

Click here to watch a video introducing you to Google CS First!

Student Instructions:

  1. Go to csfirst.withgoogle.com
  2. Tap or click the Curriculum button
  3. Scroll down and choose one of the following lessons to explore:

              An Unusual Discover

              Animate a Name

              Create your own                        Google Logo

  1. Scroll down and tap or click on the puzzle piece next to step 1 of the activity.
  2. Watch the videos and follow the onscreen directions
  3. If you finish one, use steps 1-3 to explore another lesson

Scratch

  Welcome to the Scratch Station!

Click here to watch a video introducing you to Scratch!

Student Instructions:

  1. Go to scratch.mit.edu
  2. Tap or click the Start Creating button
  3. Press the Play button in the Tutorial Screen
  4. Press the Forward Arrow to Progress through the Tutorial
  5. Continue exploring, Programming and Creating in Scratch

Interland

Welcome to the Interland Station!

Click here to watch a video introducing you to Interland!

Student Instructions:

  1. Go to beinternetawesome.withgoogle.com
  2. Tap or click on Explore Interland
  3. Watch the introduction and then click Let’s Do This
  4. Play your way through the different Interland Islands

TinkerCAD


Welcome to the TinkerCAD Station!

Click here to watch a video introducing you to TinkerCAD!

Student Instructions:

  1. Go to tinkercad.com
  2. Tap or click the Join Your Class button
  3. Enter the Class Code shown here

                        WLQD-9MMT-X6B5

  1. Enter your student Nickname

Choose one of the following nicknames:  south1, south2, south3, south4, south5

  1. Tap or click the Learn button
  2. Tap or click one of the lessons for starts and progress through the lesson at your own pace
  3. If you finish one lesson, go on to the next lesson and explore in TinkerCAD

Makey Makey


Welcome to the Makey Makey Station!

Click here to watch a video introducing you to Makey Makey!

Student Instructions:

  1. Gather 2 colors of Play Doh and an index card to use for your controller
  2. Using the South Links shortcut, open Makey Makey Mario Scratch Game. You’ll be playing it later at this station.
  3. Carefully follow the step-by-step directions on your station table to create a game controller out of play doh and a Makey Makey.
  4. Enjoy playing Mario with the controller you just created!
  5. Explore…what else can you do with a Makey-Makey?

Cubelets


Welcome to the Cubelets Station!

Click here to watch a video introducing you to Cubelets!

Sense – Think - Act

Student Instructions:

  1. Use the three Cubelets provided to create each of the following robots:
  • Fraidy Bot – A robot that is afraid of you and runs away when it sees you coming!
  • Friendly Bot – a robot that comes to you when it senses you are near it!
  • Dizzy Bot – a robot that you make dizzy and spins around and around when you come close!
  1. Use the additional Cubelets to create a robot of your choice

Ozobots

Welcome to the Ozobot Station!

Click here to watch a video introducing you to Ozobots!Opens in a new browser tab

Student Instructions:

  1. Complete the Ozobot Bot Camp. This is the packet at your station. You will end with playing a game of bowling with your Ozobots.
  2. Race your teammates to see who can get their Ozobot to a finish line first. Your team gets to create the start and finish line. What codes will make your robot go faster and win?
  3. If you have extra time, explore what more you can do with your Ozobot

                  What can you create?

                  What problems could your Ozobot help solve?

Clicks

Welcome to the Clicks Station!

Click here to watch a video introducing you to Clicks and Decomposition!Opens in a new browser tab

Student Instructions:

  1. Choose a structure to create from the instruction pages at your station
  2. Decompose the problem
  3. Complete the structure
  4. If you finish one structure, try decomposing and creating another!

Lego Design and Problem Solving

Welcome to the Lego Station!

Click here to watch a video introducing you to using Legos with the Design Process!Opens in a new browser tab

Student Instructions:

  • Use Legos to create or accomplish one ore more of the following challenges:
  • You were hired by an amusement park to create a new roller coaster
  • NASA needs you to build a new Rocket that can go to the moon
  • Your parents/guardians want you to design a new home they could one day build to meet the needs of your family members
  • You enter a contest to build the a watch tower – It needs to be tall, yet sturdy
  • You and 4 friends are stranded on an island. Build a model of a boat you’d use to find your way home
  • The county wants you to build a bridge to connect one side of the town to the other

As your team is designing, keep in mind the design process.

Adapted from 30 Day Lego Challenge, https://www.pinterest.com/pin/556335360202651986/?lp=true

Green Screen

Welcome to the Green Screen Station!

Click here to watch a video introducing you to Green Screen!

Student Instructions:

 1.  As a team, think of what kind of video you'd like to record today. Do you want to make a weather report, news cast, promotional video, or some other idea? Take 2 minutes to brainstorm your ideas. Use the timer at your station to keep track of time.

2.  Using the directions at your station, begin setting up your green screen on the iPad app.

3.  Record and save your green screen video.

Today is all about you getting to know the green screen process and software, so don't worry if you're not a movie star :)

  Green Screen Directions.docx 

Mecaniko

Welcome to the Mecanico Station!

Click here to learn more about the different types of engineering and the Mecaniko station!

Student Instructions:

Every young engineer can build objects from the real world!
This station allows you to use screws, pulleys, nuts, and more, promoting reasoning skills through building simple and complex objects.

  1. Choose a design card
  2. Examine the card to see what building tools and pieces you will need
  3. Design the structure
  4. If you finish one structure, try building another one!

Harry Potter Coding

Welcome to the Harry Potter Coding Station!

Click here to watch a video introducing you to Harry Potter CodingOpens in a new browser tab

Student Instructions:

  1. Open the Kano Coding App on your taskbar (that’s the bar across the bottom of your computer screen).
  2. Login with the following login:
    Username:  SouthDumbledore1
    Password:  dumbledore1
  3. Point your wand to the center of your computer screen and press the power button on the top of your wand to connect and re-center it.
  4. Click on the Orange flashing Circle on your page to take you to the next challenge.
  5. Follow the on-screen directions.


Catapult Challenge

Welcome to the Catapult Challenge!

Student Instructions:

 Researching and Examining Catapults

  1. Using the catapult at your station, test out the accuracy (how well you can get the ball into a set location/target) as well as the power (how far you can launch the ball) of the catapult.
  2. Complete a few of the challenges on the challenge cards. As you are completing the challenges, think about what is making that catapult work, what is making it more accurate, what is making it more powerful. You’ll use this knowledge in the next step!

Creating Your Catapult

  1. Now that you’ve used a pre-made catapult and examined how it works, it’s time to create your own! Using the materials at your station, design a catapult. Your catapult needs to be both accurate and powerful. It does not have to look just like the example catapult you've been experimenting with…be creative with your design!
  2. Speaking of design…make sure you’re using all of the steps to the Design Process as you create your catapult

Testing Your Catapult

Once you have built your catapults, it is time to launch! Test your catapults for accuracy and distance.

  1. Test 1 - Accuracy Cotton balls and a bowl make-up this test. The bowl will be in a set location (works well on the floor). Teams will have 2 test runs to determine launching distance. Then, from a set distance, students will launch their cotton balls. Record how many make it into the bowl out of 5 attempts.
  2. Test 2 - Distance  Set-up a launch line using masking tape. Students launch 3 times per catapult and record each distance using a measuring tape. If it is too much hassle to record the distance, have students launch each of his/her catapults and mark which one went farthest for each trial.
  3. Evaluate your design and make some changes if necessary. Test your catapults again for accuracy and distance. You're using the Design Process!


Math Extension

  1. Make a graph to record the distance results
  2. Find the average of the 3 distance trials.
  3. Determine how the angle of the launch changes the results of your accuracy and distance tests
  4. What other ways could you use the data from your catapult launches?

Pendulum Challenge

Welcome to the Pendulum Challenge!

Student Instructions:

 Researching and Examining Pendulums

  1. Using the pendulum at your station, test out the accuracy (how well you can get the ball into a set location/target) as well as the power (how far you can launch the ball)
  2. Complete a few of the challenges on the challenge cards. As you are completing the challenges, think about what is making that pendulum work, what is making it more accurate, what is making it more powerful. You’ll use this knowledge in the next step!

Creating Your Pendulum

  1. Now that you’ve used a pre-made pendulum and examined how it works, it’s time to create your own! Using the materials at your station, design a pendulum. Your pendulum needs to be both accurate and powerful. It does not have to look just like the example pendulum you've been experimenting with…be creative with your design!
  2. Speaking of design…make sure you’re using all of the steps to the Design Process as you create your pendulum

Testing Your Pendulum

Once you have built your pendulums, it is time to launch! Test your pendulums for accuracy and distance.

  1. Test 1 - Accuracy Ping Pong balls and a bowl make-up this test. The bowl will be in a set location (works well on the floor). Teams will have 2 test runs to determine launching distance. Then, from a set distance, students will launch their cotton balls. Record how many make it into the bowl out of 5 attempts.
  2. Test 2 - Distance  Set-up a launch line using masking tape. Students launch 3 times per pendulum and record each distance using a measuring tape. If it is too much hassle to record the distance, have students launch each of his/her pendulums and mark which one went farthest for each trial.
  3. Evaluate your design and make some changes if necessary. Test your pendulums again for accuracy and distance. You're using the Design Process!

Instant Challenges

Use the link below to access Instant Challenges and other Resources from Destination Imagination.

Instant Challenges


Lego Maze Ozobot Challenge

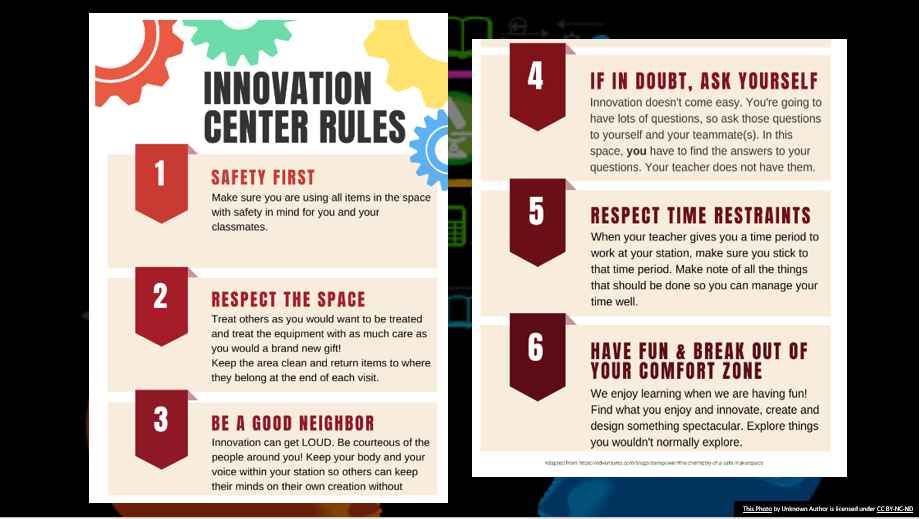
An Introduction to the Innovation Center

Video Introduction of the Innovation Center